8. Firing the Oven

Burning Kindling in the oven entrance

Burning Kindling in the oven entrance

I discussed the process of firing the oven in a previous post but I thought it warranted its own posting because if you don’t get this right – you wont be cooking anything!

This is the way I do it.

  1. Prepare a nice big pile of kindling
     
  2. Roll some balls of newspaper and pile them just inside the mouth of the oven in a cone shape
     
  3. Pile kindling sticks around the newspaper like you are constructing a wigwam
     
  4. Light the newspaper and let the fire catch.  Now at this stage I have a handy cheat that you might find useful.  I have a weed burner which I bought a few years ago and never used and it is perfect for getting these fires going in the oven.  It isn’t very Eco-friendly through so I won’t encourage you to buy one but if you have one lying around and some spare gas then go for it!
     
  5. Gradually keep adding kindling to the small fire until it builds to a nice little blaze.  At this stage you can move it a little further back into the oven.  I push the fire using a shovel or, and I find this works well, my bakers peel.
     
  6. The process is then to gradually add more wood (gradually larger pieces) and when roaring, push it back more until the fire is blazing near the back of the oven.  This might take about 40 mins to an hour.  Be careful when you are pushing the fire backwards as it has a tendency to go out.  If you find it has died back try adding some small pieces of kindling and blowing and/or some balls of newspaper.
     
  7. In order to get the oven up to temperature (and I mean so that it is capable of retaining heat, without a fire burning in it for several hours) you need to keep the fire blazing for at least another 1.5 to 2 hours.  If you intend to cook with a small fire still burning (how I cook pizzas), the oven will be ready after about an hour.
     
  8. If you intend to remove the embers and use the oven without a fire burning it’s a good idea to spread the glowing embers across the floor of your oven for 10 minutes before removal.  I then scrape them out with the peel or shovel and dump them into a metal bucket to cool.
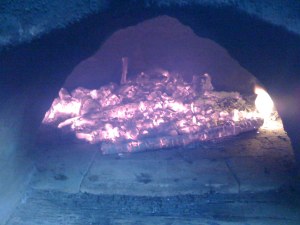
The fire is roaring at the back of the oven

The fire is roaring at the back of the oven

Hot embers spread across the floor of the oven before removal.

Hot embers spread across the floor of the oven.

Finally a word of warning.  If you have any sort of hair on the front of your head and want to keep it that way WEAR A HAT OR CAP when you fire your oven.  You will need to keep looking into the oven and when it is throwing out 450-500 degrees Centigrade of heat you will singe your hair.  You may not find this as hilarious as my wife did! 

7. The Final Layer

The final layer.  The oven is complete!  The final layer. The oven is complete! 

So at last we reach the final layer.  Once the insulation layer is dry you can crack-on and finish your oven.

The last layer uses the exact same technique as the first layer so you should be an expert by now. Using the same proportions, mix a batch of sand and clay together applying the good old puddling technique described earlier.  Again, the amount you need depends on the size of your oven but remember that this last layer will require more than the first layer due to the greater surface area you need to cover.  You will also need some spare mix to extend the chimney (if like me you didn’t make it tall enough first time round!) and to keep for filling cracks.  Make “bricks” as before and gradually build-up the final layer. After you have inserted the last brick, pull-up a chair, open a cold beer and sit back and admire your work.  Well done, your oven is complete!  

Next time I am going to provide some pointers on firing the oven so you can get the best use out of it when cooking. 

Finished oven from the front.

Finished oven from the front.

6. The Insulation Layer

Entrance dry? Chimney dry? Great! Let’s start building the next layer – the insulation layer.

What you’ll need:

  • Some clay
  • Some wood shavings
  • Some water
  • A bucket
  • A wheelbarrow
  • A spade
  • A power drill and plaster mixer (optional)
The insulation layer complete.

The insulation layer complete.

First thing you are going to do is make a clay slip which is simply clay mixed with water. The simplest way to do this is to put some water in a bucket and slowly add chunks of clay, squashing, squeezing and mixing with your hands as you go. Alternatively you could add water to half a bucket of clay and leave it to soak for a couple of days. You could then squish-up the clay quite easily.  You are aiming for a consistency similar to that of thin natural yogurt.  

I spent quote a long time making my slip until I discovered a short-cut method using a drill and plaster mixer. It works really well but is very messy! Chuck your clay and water in a large bucket (or large bin) and blitz it with the mixer.  Job done!

Next throw some wood shavings into a wheelbarrow. I bought a huge bag of wood shavings from a local pet shop and I still have three-quarters left (any takers?). Add some of the clay slip and mix well with a spade or get your hands dirty. The mixture should be wet enough to form “bricks” similar to those you made for the clay-sand layer.

Build up the insulation layer using exactly the same technique as before. Simple! Leave it to dry and then you can move on to the last step in the build – woo hoo!

5. The Oven Entrance and Chimney

The oven layer is complete!

Just a dome-shaped sculpture without the entrance and chimney.

You have completed your first layer and now you need to build a nice entrance at the front of it in order to get food in an out (unless you leave it as a dome shaped sculpture!). At this stage we will also be removing the sand former and building a chimney.

You should have left the oven layer to dry for at least 4 hours before you attempt to cut the oven door but don’t leave it so long that the clay-sand mixture dries too hard or you will find it tricky to cut.

The dimensions of the entrance are dependant on the dimensions of your oven. Generally though, you don’t want it so big that it effects the heat retaining potential of your oven nor too small so you can’t get anything bigger than a tiny pizza through it.  In the end I chose the width of my door based upon the width of a standard roasting tray and, as it happens, the width of the bakers peel I had bought.  Don’t worry too much about the height at the moment because you will probably adjust that later on once you have fired it.

The oven entrance removed revealing the internal sand former

The oven entrance removed revealing the internal sand former

Roughly mark the width and curve of your oven entrance and then, using nothing other than a carving knife, slowly cut it out.  It will probably come away in large chunks – a very satisfying experience!

This is the moment of truth! Get yourself a bucket and start to excavate the sand from within the oven layer. Don’t forget to keep the sand for later clay-sand layers. Hopefully you will be able to excavate the sand until you reach the newspaper layer on the inside of your oven without the dome collapsing.  Take it nice n slow but I’m sure you’ll be absolutely fine.  Remove as much newspaper as you can but don’t worry too much because it’ll burn off anyway the first time you fire the oven.

Firing the oven

Kindling burning in the entrance to the oven.

Kindling burning in the entrance to the oven.

Next you need to dry your oven layer.  If you are lucky enough it will dry nicely over a few days in direct sun. However you should also fire the oven at least once to help the drying process but also to check the entrance is high enough to allow smoke to escape (see below).

The method for firing the oven is quite simple but do bear in mind that at this stage the oven will be rather damp and does not have a chimney so you might find it takes a little bit of perseverance to get the fire going. This is how I do it:

  1. Prepare some nice “pencils” of kindling.
  2. Scrunch up five or six pages of newspaper into balls and form into a rough pyramid inside but near the entrance to your oven.
  3. Build up kindling around the newspaper as if building a wigwam.
  4. Light the paper and hopefully the kindling will soon ignite.
  5. Watch the fire closely and keep slowly adding more and more kindling until it starts to burn well.
  6. At this point, using a spade, metal rake or even a bakers peel, slowly push the fire back a little into the oven.  Don’t push it too far because it is likely to go out.
  7. Add more wood and when it is burning fiercely move it back some more.  Eventually you want the fire to be burning in the centre-back part of the oven.
Fire blazing with dry patches appearing on the outside of the oven.

Fire blazing. Note dry patches appearing on the outside of the oven.

A couple of tips here.  Firstly, take it slowly. If you try to move things along too quickly you are likely to extinguish the fire.  If it looks like it is going out, screw-up a few balls of newspaper and throw them in. This is usually enough to re-kindle the blaze.  Secondly don’t use large chunks of wood  – smaller pieces burn better.

At this point you can modify the height of the oven entrance if you need to.  Look carefully at how the smoke is moving.  If it is “pooling” inside the top of the oven you need to cut your entrance higher to allow the smoke to escape.

As the oven dries it will steam and might produce a few cracks.  Don’t panic!  Fill in any cracks with spare sand-clay mixture before you move on.

Building the Brick Arch

Now the oven layer is dry you can build the extension to the entrance.  Extending the oven entrance with bricks not only looks nice but it also protects the entrance from knocks.  

Simply build a sand former in the newly cut arch of your oven, extending forwards about one brick length. Place a brick either side of the former on the top of the plinth using some of the sand-clay mix as mortar to hold them in place.  Gradually build up the archway around the former using more of the “mortar” mix between bricks.  You might have to use quite a lot of “mortar” in order to produce the correct curve for the arch (as you can see in my photographs below).  The last brick should form the keystone of the arch.  Leave the “mortar” to dry a little then remove the sand former. Hey presto – a perfect arch!

The Chimney

You need to cut a circular hole in the top of your oven just behind the brick arch entrance.  I sketched a rough circle on the top with a pencil then drilled holes around the circumference in order to help with removal of the now solid “cement”.  Just tidy the edges up a little with a knife then build-up a small 20cm chimney around the hole using more sand-clay mixture.  Finally, close any gaps between the brick arch, the oven entrance and the chimney using the remaining sand-clay mixture. 

Entrance and Chimney done!  Leave it to dry before we move onto the next stage – the insulation layer.

Brick arch and chimney complete.
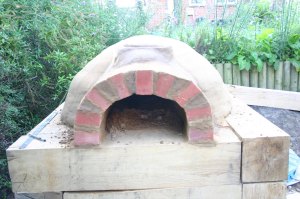
Brick arch and chimney complete.

The brick arch and chimney from the front.

The brick arch and chimney from the front.

4. The Dome Sand-former and First (Oven) Layer

Finally it is time to start building your oven. For this stage you’ll need:

  • Builders sand
  • Old newspapers
  • Water
  • Tape measure or long steel ruler
  • Clay-sand mixture

You are going to build a large sand dome – the former which supports the first clay-sand layer of your oven. I really enjoyed this part of the process mainly because it provided a practical justification for the hours I spent building sandcastles on the beach with my stepson Thom when he was a little lad (to be fair it was usually me who wanted to build the sandcastles!).

Sand dome partly covered with wet newspaper.

Sand dome partly covered with wet newspaper.

Tip lots of sand onto the brick floor of your oven.  I’m not sure how many bags I used but I remember being amazed at how much was needed to build up the dome to the required dimensions.  Remeber the outside of this dome will form the inside dimensions of your finished oven.  The base (widest part) of my oven is the same dimensions as the length and width of the brick floor (80x80cm).  I decided to make the height of my oven approximately half that of the diameter (40-45cm). Build up the dome, moulding and sculpting with your hands until it is the desired height and a nice shape.  A top tip from Steve at River Cottage HQ is to keep checking the shape of the dome from above, so periodically stand on your plinth to get that birds-eye view! Once you are happy with the shape, firm-down the sand with your hands.

Sand former covered with newspaper

Sand former covered with newspaper

Next you need to add a layer of wet newspaper.  This makes removal of the sand from inside the cavity much easier later on.  It is a little tricky to get the paper to stick but persevere and you’ll crack it.  Thats the dome complete. Now you are ready for your first oven layer.

The First (Oven) Layer

If you are doing this alone make sure you leave 3 or 4 hours to build your first oven layer.  I made the mistake of starting in the early evening and ended up finishing it at midnight wearing a head-torch!

Take some of the clay-sand mixture from your wheelbarrow in cupped hands and form it into an elongated/rounded brick shape.  Press this first “brick” against the  base of the dome and compress it into place, with one hand holding it against the sand former while the other makes a “karate-chop” type movement (using a straight hand) against the “domeward” side of the brick. This creates a wedge-shaped “brick” (sloping towards the dome) which helps when adding layers above and also removes any air bubbles from the mixture which may subsequently expand and crack the oven. You are aiming for an oven layer that is approximately 7cm thick and the simplest way to keep check of this is to measure the bricks periodically against a marked stick or even a piece of straw.  Add another “brick” next to the previous one and, using the same technique, mold it into the first.  Repeat the process until you have laid “bricks” around the whole circumference of the dome.

First few "bricks" of clay-sand oven layer.

First few "brick" layers.

Begin laying “bricks” on top of this first layer and continue, round and round, up and up, until you have completely covered the sand dome former.  Remember to keep checking the oven layer thickness as you go. Don’t worry if you end up with some variation in thickness – as you build the oven layer up you might find that the base widens out a little from the weight of “bricks” above.  Smooth and shape the oven layer into a neat, coherent shape and don’t forget to check from above.

That’s it!  Your first layer is complete.  You need to leave it to dry for a few hours before you cut the hole for the oven entrance – which I’ll discuss next.

The oven layer is complete!

The oven layer is complete!