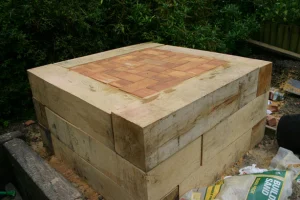
Your plinth has two main functions. Firstly, it raises your oven to a height that makes it practical to use. Imagine trying to slide pizzas in and out of the oven on a baker’s peel if the entrance is at ankle level. You would end up with a bad back and a charred mess in the oven! Secondly the top of the plinth forms the all important brick base to your oven.
Materials for plinth construction
Your choice of materials is dependant on personal taste, availability and budget. If you scour around the Internet you will find plinths made from natural stone, bricks, cob, wood and earth and wood alone (like mine). No one solution is better than the other so take your pick. I am going to show you how to build a simple but beautiful plinth made from wood. I was lucky enough to get hold of some oak beam off-cuts from a local timber merchant. They are very attractive and very heavy!
Plinth Foundation Construction
If you are going to use a construction material with substantial weight from which to build your plinth and are building on soft ground you will need to establish a foundation first. This is pretty easy. In my case I dug a 40-50 cm deep hole slightly wider and longer than my intended plinth dimensions (120 Cm x 120 Cm) and filled it with hardcore (rubble) to a level just below the top of the hole. I then topped this off with a layer of builders sand and finally laid a paving top onto the sand. Continuing with the spirit of recycling, I managed to get hold of some broken slabs which I laid as crazy paving to form the flat level of my plinth foundation. You can of course use other foundation methods such as concrete. If you are lucky enough to have a chosen a location with a solid floor on which to build your oven then you can skip this step.
Plinth Construction
So you have a nice flat and solid base it is time to start building the plinth. This is where building with timber comes into its own because it is just so simple! Before you start building though you need to think about dimensions and this will involve a little forward planning.
The plinth needs to be wide enough (and as your oven is going to be circular I suggest you make the plinth square) to accommodate all three layers of your oven. The most important measurement is the diameter of the first layer – the inside of your oven. You need to decide what is practical for your needs. If you only ever intend to bake pizzas in it then it could be quite small but if you want to use it to roast legs of lamb or pork joints you need to make the oven layer wide enough in diameter to accommodate a roasting tin. The internal diameter of my oven layer is 80cm which therefore means the brick floor on the top of my plinth is also 80cm x 80cm (you wouldn’t want any part of the wooden walls to be inside the oven when you fire it!). Working out from here, each of the 3 layers should be approximately 7cm thick, so the total thickness of the oven walls Will be around 21cm. Add this dimension to each side of your brick floor width and you will end up with the correct dimensions for your plinth. Phew! So my plinth top dimensions are 120cm x 120cm.
Once you have your dimensions sorted, construction of the plinth is very easy. Simply cut the timbers to the correct length, not forgetting to leave enough space for the overlapping end of each side. Then build the sides up as if building a wall – overlapping the lengths of wood to add strength to the structure. You shouldn’t need to use any “cement” between layers if you are using heavy timbers like mine. Try to make the top layer as level as possible as this will help when trying to level the brick oven floor. I used four internal corner angle brackets on each layer in order to prevent the structure from moving out of shape.
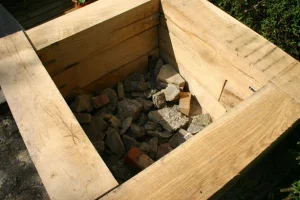
Your next task is to fill the plinth “box” with rubble (hardcore) to a level of about 30-40 Cm’s below the top.
After this stage I decided to add a layer of builders sand followed by a layer of glass bottles (whole with tops removed). My reason for doing this is that the glass bottles should provide an extra layer of insulation and retain heat below the brick floor of the oven. I have no idea if this actually works but I had loads of bottles lying around so thought I’d give it a whirl!
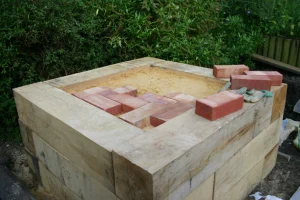
Finally add another layer of sand up to a depth below the surface of exactly one brick deep.
Brick Oven Floor Construction
This is the last stage in construction of your plinth. The brick floor is obviously a critical component of your oven so I suggest you take your time with this and do it right.
You’ll need some bricks, something to cut them with and some more builders sand. I used bog-standard London bricks and a hammer and bolster to cut the bricks (although I’m not very good at this and broke quite a few!). Use any bricks you can get your hands on but try and look for ones with a nice flat surface, without cracks and any that look too porous. Bricks with hairline cracks will break when you come to cut them or later when they are fired in the oven.
All you need to do then is fill the top layer of your plinth with bricks. I chose to use a herringbone pattern which holds together nicely without cement. Remember to try and make the oven floor as level as possible.
Once you have laid all of the bricks in place brush handfuls of building sand into any gaps to prevent any further movement of the bricks.
That’s it! Your plinth is complete and ready for the next stage – building the oven!


Hi Simon,
When the bricks used for the base are heated and reach very high temperatures, are the wooden beams surrounding them in any danger of getting burnt or damaged?
Thanks,
Romi
Indeed they are, Romi. In fact, that was a design fault in the original build. I remedied this later on by cutting a chunk out of the beam in front of the entrance and added a heat-proof tile.
Hi,
I have been cracking on with my pizza oven plinth for the last couple of weeks. Im about ready to fil the plinth and brick it but im just wondering what purpose the rubble has in the bottom of the plinth?
Also you used bricks for the oven base, would fire bricks be a good option for this also?
Rich
Hi Rich. The rubble is only to fill the plinth up to a level where you can lay the bricks for the oven base. Fire bricks would work, although I think they are more expensive than standard house bricks.
Have fun!
S
Thanks for the reply. So if i make the plinth less tall then i can skip the rubble.
Can i ask should i stick to one layer of bottles or would it improve it if i had two?
Yes, lower plinth = less rubble.
Re. bottles, I don’t think it’ll make much difference but also it won’t make things worse!
S
Can I use white sand rather than builders sand? I have a lot of this available.
Any sand will do! 🙂
How much sand would I need for the whole project? Are we talking like a truck bed load?
Have a look at this article.
Hello,
You state that the wooden part of the plinth shouldn’t be inside the oven, however on your oven it is just inside the entrance. How is your wood beam holding up with the heat?
It wasn’t! Have a look at the photo on the home page now (the one with the metal chimney). You’ll see I have put in a stone tile. The front totally burnt out!!!
Hi Simon,
I’m currently following your guide but i have constructed my plinth using celron blocks then added 4 paving slabs on the top to make the 120×120 surface.
I was then going to do a layer of sand then add the London bricks to create the oven floor but i have since learnt that the paving block may crack due the the heat and with just a layer of sand then the London bricks it might not be enough insulation.
Do you have any advice on what i could use to further insulate.
As long as they don’t crack and completely fall through, you should be OK.
Simon
Hello! I’m currently planning the space needed for our clay oven and wanted to know if there is a standard ratio of oven space to wall thickness? i.e. your internal space is 80cm and total width 120cm which suggests your walls are 20cm thick. Does this hold the heat for long enough to roast or slow cook in?
Thanks for all the information!
Adam
Hi Adam thanks for the post. The oven is made up of three layers, each approximately 7-10cm thick. The structure will hold heat for a very long time (after firing to full temperature it will still be around 90 degrees C after 24 hours.
I hope this helps.
Simon